Head and Shoulders pattern
This lesson will cover the following
- What is a “Head and Shoulders” formation?
- How can it be confirmed?
- How can it be traded?
The Head and Shoulders pattern forms after an uptrend and, once confirmed, marks a trend reversal. The opposite pattern, the Inverse Head and Shoulders, therefore, forms after a downtrend and marks the end of the downward price movement. In this article we will discuss only the Head and Shoulders pattern because the inverse variety is its twin viewed from a bullish perspective.
As you can guess by its name, the Head and Shoulders pattern consists of three peaks – a left shoulder, a head and a right shoulder. The head should be the highest (what an abomination it would be otherwise) and the two shoulders should be relatively equal in height. As the price corrects from each peak, the lows to which it retreats form the so-called neckline, which is later used to confirm the pattern (we will get to that soon enough). Here is what an H&S pattern looks like.

Other key elements of this pattern and its trade process are the breakout, protective stops, profit target, and volume, which is used as an additional tool to confirm the trend reversal. Here is how to identify the Head and Shoulders pattern and how its individual components are characterised.
- Trade Forex
- Trade Crypto
- Trade Stocks
- Regulation: NFA
- Leverage: Day Margin
- Min Deposit: $100
Formation and confirmation
 In order to have a trend-reversal pattern, you need a trending market, which, in our case, should be an uptrend.
While prices are trending up, the prospective pattern’s left shoulder forms as a peak, marking the high of the current trend. For the shoulder to form, the price then needs to correct, retreating to a low that is usually above or at the trend line, thus keeping the uptrend intact. This low marks the first point used to determine where the neckline stands.
Afterwards, a new, higher peak begins to form, stemming from the left shoulder’s low; this is the pattern’s head. As the market makes this higher high – the head – it then corrects, and this is usually the point at which the upward trend is broken, signalling a shift in momentum and the emergence of a possible Head and Shoulders pattern.
The second low reached after the retreat from the head’s peak provides the other point used to draw the neckline, which is simply a line connecting the two lows.
The subsequent rebound from the second low forms the third peak – the right shoulder. It should be lower than the head and roughly match the height of the left shoulder (exact symmetry is rare). It is also preferable that the two shoulders take approximately the same amount of time to form, as this makes the pattern stronger.
In order for the Head and Shoulders pattern to be confirmed, the retreat from the third peak (the right shoulder) must penetrate the neckline and a candle must close below it.
Ideally, the neckline is horizontal, but that is rare. More often it slopes either upwards or downwards, which is also significant – a downward-sloping neckline is more bearish than an upward-sloping one.
Volume
 As mentioned above, volume plays a key role as a confirmation tool and can be assessed with indicators or simply by analysing its levels. Ideally, volume during the left shoulder’s advance should be higher than during the subsequent advance, because when the head reaches a higher high on declining volume, it provides an early warning of a possible reversal. This, however, is not always the case.
Further confirmation arises when volume increases during the decline from the head’s peak, and the final nail in the coffin is added when volume rises again during the right shoulder’s decline.
Trading the pattern, stops and profit targets
 As explained earlier, the Head and Shoulders pattern is considered confirmed if the right shoulder’s decline breaks through the neckline and a candle closes below it. Once that occurs and you are convinced it is not a false breakout, you may enter a short position. However, as you already know, trading decisions should not be made on the fly; you must decide in advance where your protective stop will sit and what your profit target will be.
Protective stop
 There are two common locations for a stop-loss. The first, more conservative option, is just above the head’s peak, while a more typical placement is just beyond the right shoulder. These are visualised in the screenshot below.
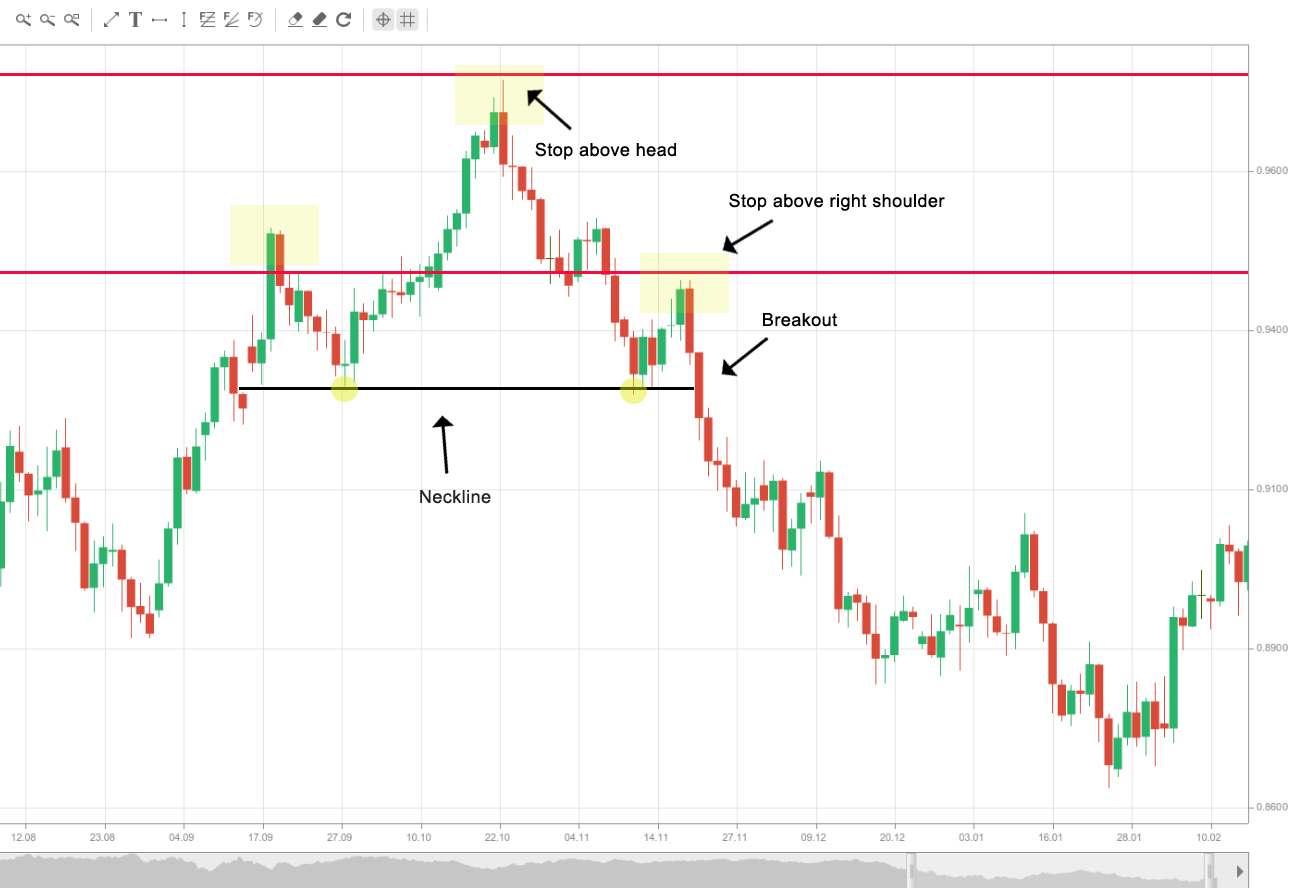
The second option is more logical because if the breakout through the neckline fails and the price rebounds with enough momentum to rise above the right shoulder, the entire pattern is invalidated and there is no need to wait for it to exceed the head as well. Moreover, such a wide stop significantly increases risk and worsens the risk/reward ratio (as you will see in the next part of the article), reducing the pattern’s trading appeal.
Profit target
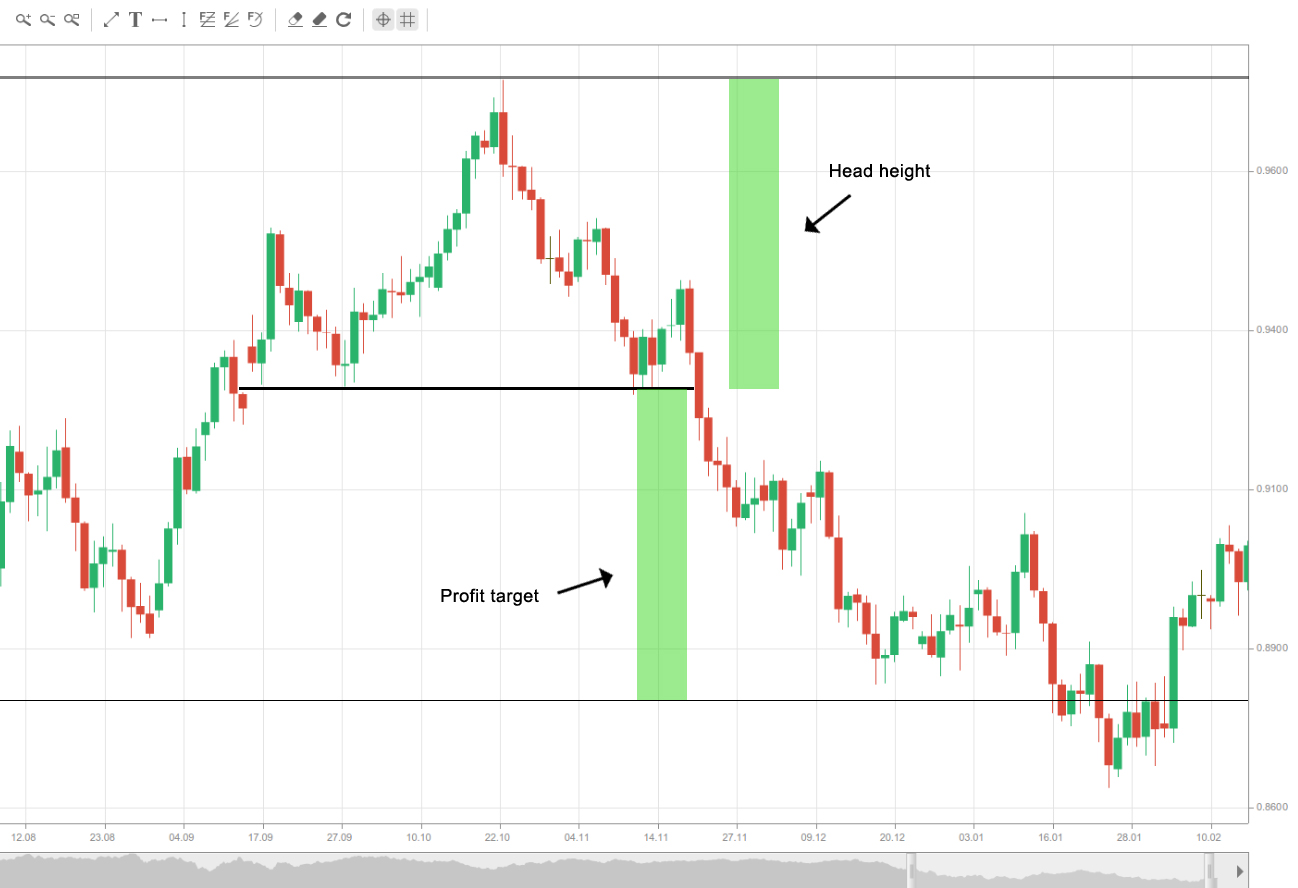
 The most commonly recommended profit target is the distance (in pips) between the head’s peak and the neckline. Once you have measured that distance, project it downwards from the neckline, as shown in the screenshot below.
What does this mean for the risk/reward ratio? If the breakout confirmation (the close below the neckline) occurs very close to the neckline itself and we open a short position there, we generally obtain a 1:1 risk-to-reward profile when using a conservative protective stop. Why?
Because our profit target equals the distance between the head’s peak and the neckline, using the conservative stop means the potential loss is the same size, thereby reducing the risk-to-reward ratio to 1:1.
For this reason, to improve that ratio, most experienced traders place their protective stops above the right shoulder’s peak when employing the head-to-neckline profit target.
Remember, though, that this price distance should be regarded as a rough target; market behaviour is seldom so straightforward, and factors such as previous support levels, intersecting medium- and long-term moving averages, and so on must also be considered.
Two ways to trade the Head and Shoulders Pattern
 There are generally two ways to trade this pattern, depending on how it develops. The first we have already mentioned: as soon as a candle closes below the neckline, confirming the breakout, you enter a short position with the profit target and protective stop described above. This is how it looks.

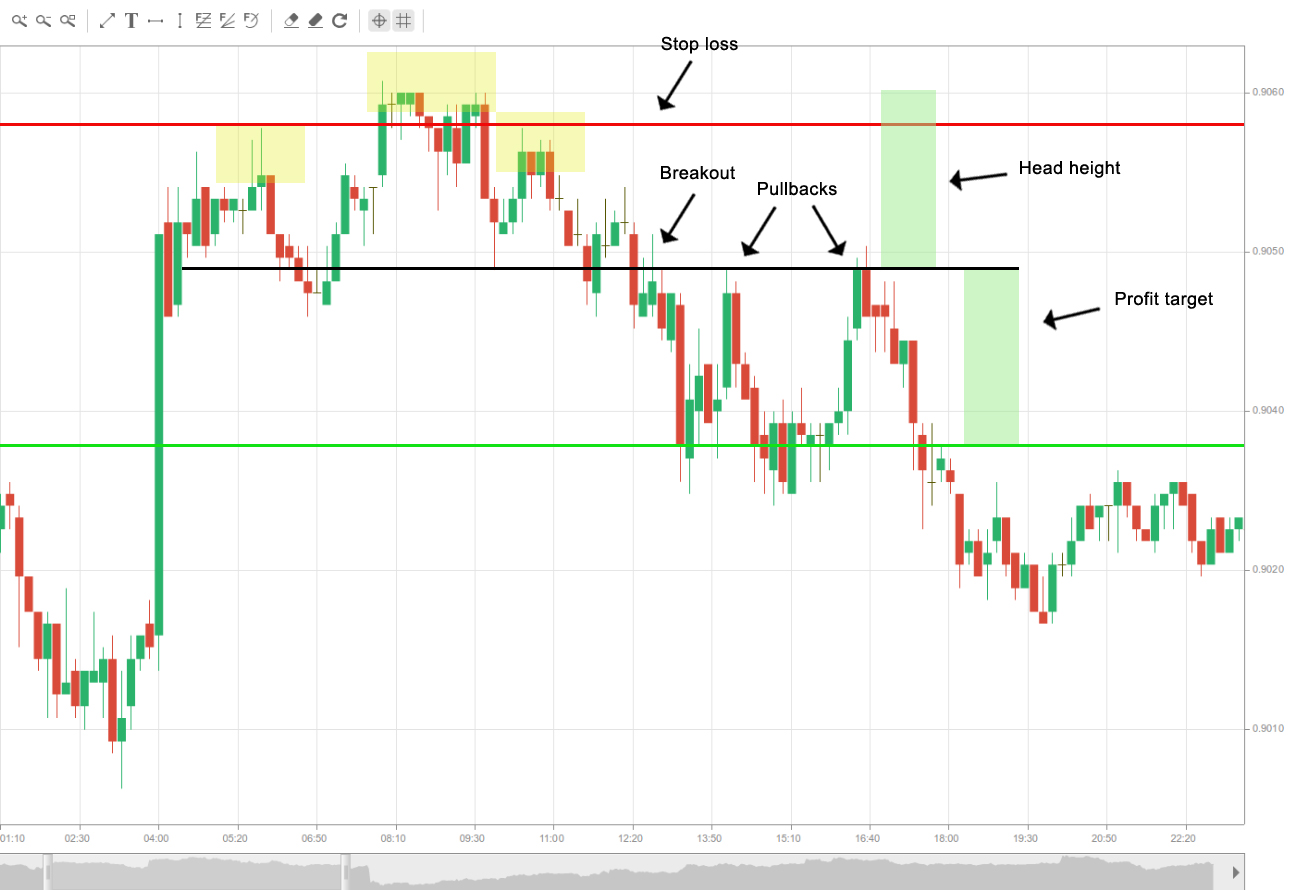
Now to the second way of trading the H&S formation. In this scenario, after the neckline is breached, the price pulls back to it; what was once support now acts as resistance. We go short when the price tests the neckline as resistance and then turns down. We apply the same principles for the protective stop and aim for the same profit as in the first scenario. Here is how this looks.